Create a Pin
This article describes how to create and modify Pins. Only authors have the right to create, modify and delete Pins. Therefore, authors must be logged in to the AppNavi widget.
STEP 1: Start the Pins creation
Once you have successfully logged in, your initials will appear in the thumbnail of the menu and you will be able to use authoring functions such as adding Pins ("+" icon).
Pins are part of a Pins set. The Pins set can consist of any number of Pins within an application.
- After you are logged in click on the "Pins" icon in the AppNavi menu bar.
- Now click on the "+" icon to initiate the Pins planner.
Note:
The Pins icon in the AppNavi menu bar only appears while you are logged in as an author in AppNavi. This allows you to create and manage Pins. Users (they cannot log in) will see the Pins directly in the application, but not in the AppNavi menu.
In case you cannot see the Pins icon although you are logged in, you need to activate this feature first in the app within the customer portal.

STEP 2: Fill the Pins set properties
The Pins planner consists of 3 sections:
- General:
Information about the Pins set such as the language of the Pins set and title. - Pins:
List of all Pins that belong to a Pins set. - Details:
To edit the selected Pins in terms of headlines, texts, images, videos, links and iframes - as well as detailed settings on Pins level such as search.
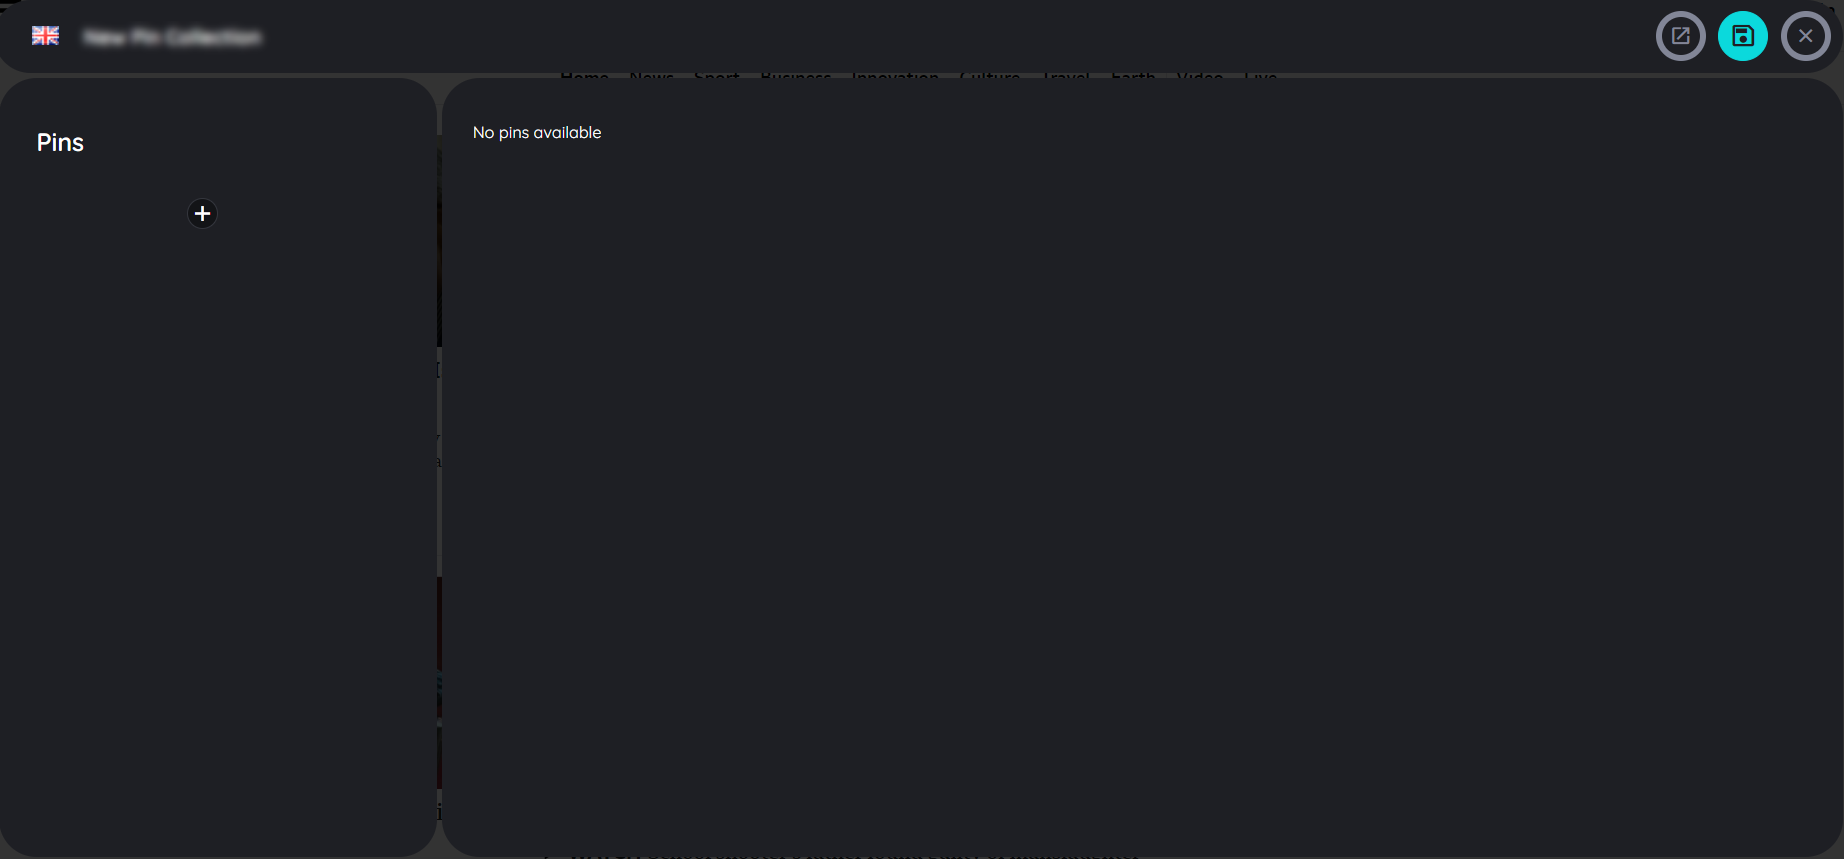
Now fill in the Pins set properties:
- Language:
Select the language in which you want to capture the Pins in that Pins set (in a later step you can translate the texts into any other language). The languages can only be added from the portal. - Title
Give the Pins set a very short, meaningful title. This title will appear in the Pins menu beside the respective Pins set.
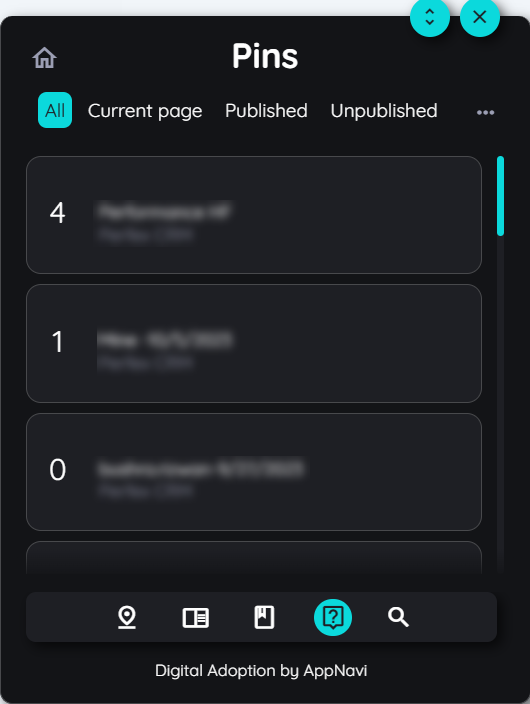
The Pins menu now displays the Pins sets that have been created. The number of Pins per Pins set is displayed - as well as the options for editing and deleting a Pins set.
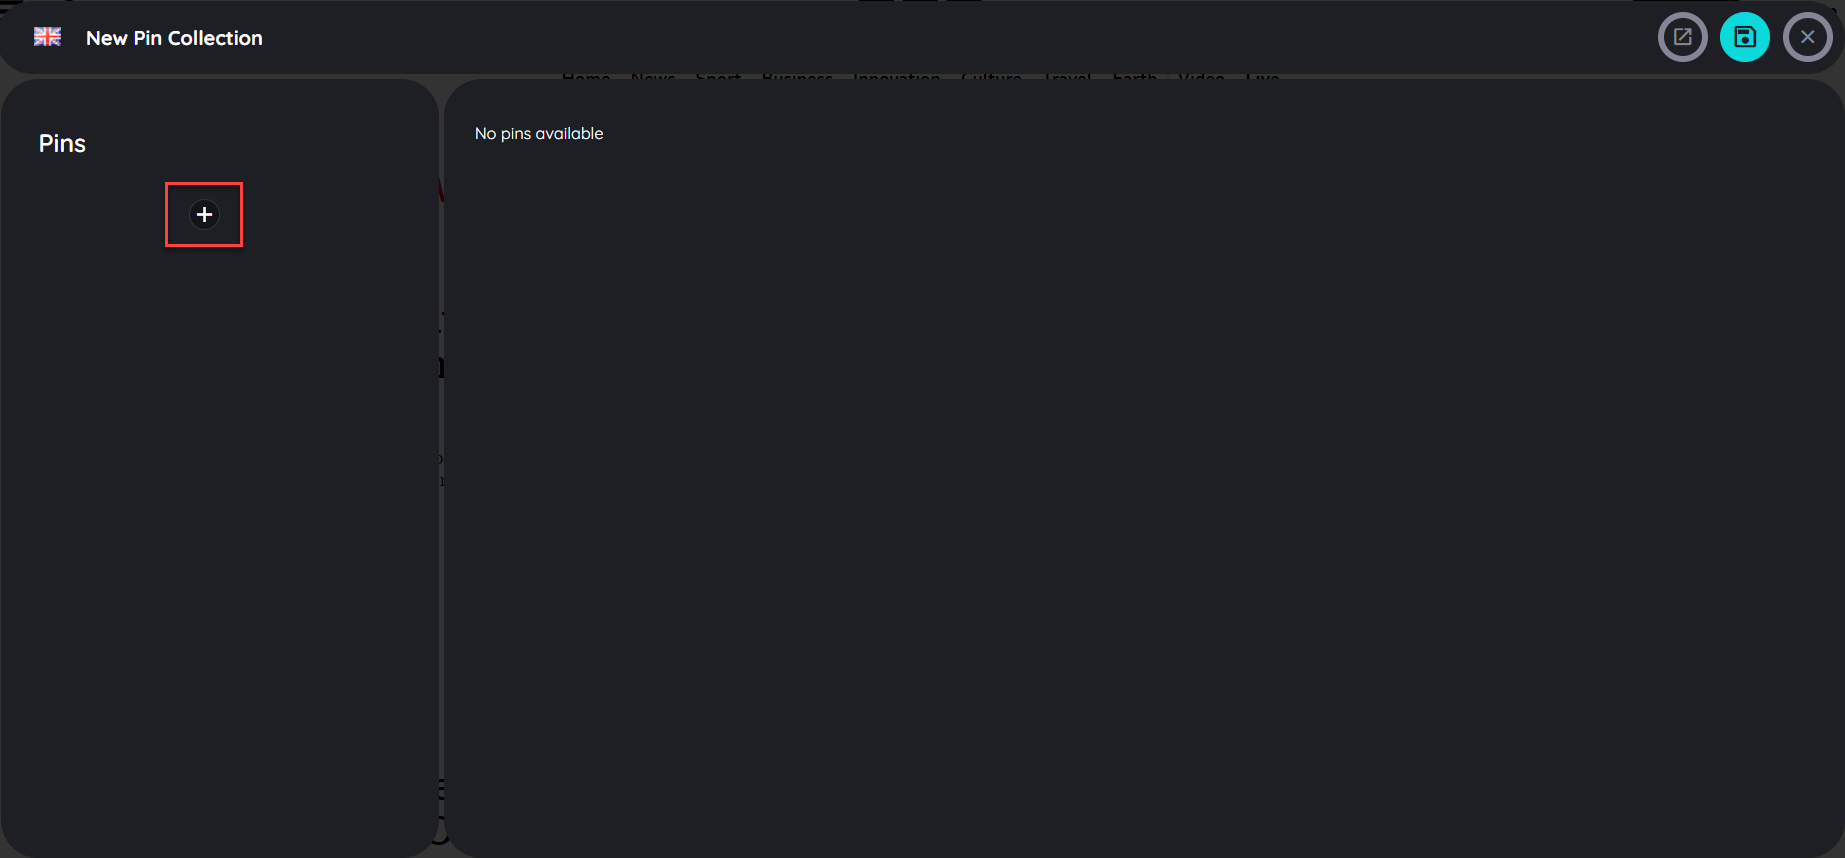
STEP 3: Initiate the Pins recorder
If you want to add Pins to your Pins set, you have to initiate the Pins recorder:
- Click on the "+" icon in the Pins menu.
- Click on the "+" icon in the "Pins" section of the Pins planner.
Now the Pins recorder will open in your application. Using the Pins recorder is analogous to using the step recorder in the route planner.

STEP 4: Select the appropriate type in the Pins recorder
You can drag-and-drop the Pins recorder to any place in your application so that it does not interfere with the capturing of your Pins.
Select any Pins (action) type from the menu by clicking on the appropriate Pins type icon.
- Start route:
Use this option if you want the user to be able to start a route at this point. - Display announcement:
Use this option if you want the user to see an announcement at this point. - Display hint:
Use this option if you want the user to see a hint at this point.
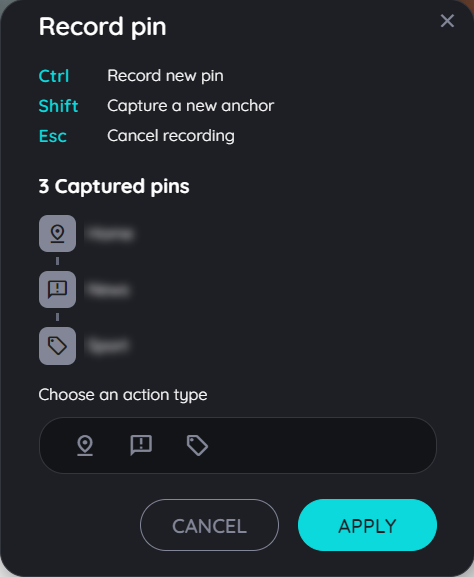
STEP 5: Capture Pins
"Capture a Pin" means, that the relevant element to which a Pins refers, is precisely captured. The intelligent AppNavi algorithm ensures that the element is still found even if the properties of an element change (e.g. search field is no longer at the top left but at the top right). The maintenance of the pin is thus reduced to an absolute minimum.
The capture element can be done in two ways: by pressing the CTRL key (default behavior) or by pressing the SHIFT key. The CTRL option directly captures elements without allowing you to fine-tune the captured path. With the SHIFT key, you can fine-tune the captured path as you get a detailed path which you can select from.
Capture with CTRL :
- Select the Pins type in the Pins recorder.
- Move your mouse over the application to the element you want to capture.
- As soon as a sea-color frame appears around the desired element, capture the element by pressing the CTRL key.
- The recorded element now appears directly in the Pins recorder. Assign a meaningful title to this element directly to simplify editing in the planner.
Capture with SHIFT :
- Select the step type in the Pins recorder.
- Move your mouse over the application to the element you want to capture.
- As soon as a sea-color frame appears around the desired element, capture the element by pressing the SHIFT key.
- A dialog appears with the different elements of the selected area: select any element which you want to capture (see image below).
- click on img tag to capture an img element only - or
- click on div tag to capture specific division of that element - or
- click body to select whole page - or
- click html to select whole html of that specific page.
- The captured element now appears directly in the Pins recorder. Assign a meaningful title to this element directly to simplify editing in the planner.

STEP 6: Cancel Pins capturing
You can cancel the creation or modification of a Pin at any time. The changes or additions made will then not be saved.
- Initiate the Pins recorder as described above.
- Select a Pins type.
- Move your mouse to the element of your application you want to capture.
- A sea-color border appears. If you want to cancel the capturing press the ESC key.
- AppNavi returns to the Pins recorder without capturing the element.
STEP 7a: Adding more steps and editing
There are numerous ways to customize a Pins set: Pins can be tested, deleted or changed in sequence in the Pins planner. The step recorder just allows to delete the recorded Pins.
Edit in Pins recorder
- Click with the right mouse button on the desired Pins in the Pins recorder.
- Select the option "Delete" to delete the captured Pins.
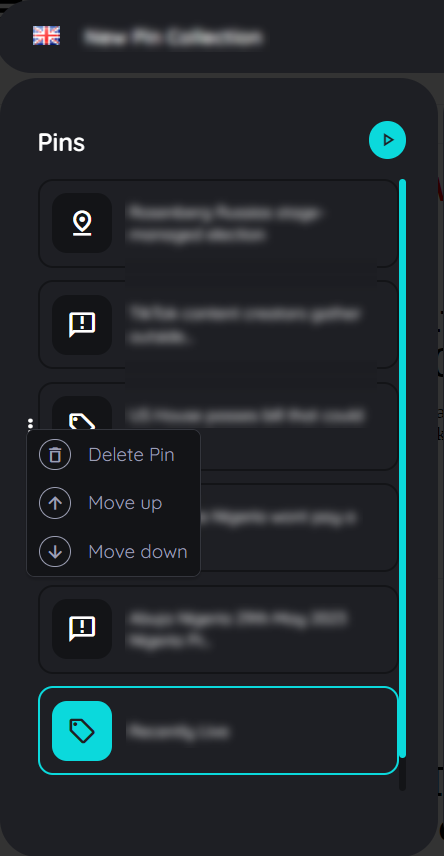
Edit in Pins planner
- Click with the right mouse button on the desired Pins in the "Pins" section of the Pins planner.
- Select one of the options that appear - or just edit the Pins in the "Details" section.
Pins options
- Test Pins
All Pins of a Pin set will be tested. - Delete Pins
The Pins can be deleted. Please note that the Pins are deleted directly after selecting the delete option without a confirmation prompt. - Move up
To change the order of the Pins the selected step can be moved upwards. - Move down
To change the order of the Pins the selected step can be moved downwards.
Add a step in the Pins planner
- Click on the "+" icon in the "Pins" section of the Pins planner.
- When the Pins recorder appears, capture Pins as described above.
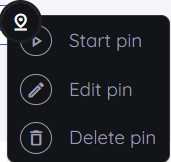
STEP 7b: Editing a Pins right in the application
Besides the possibility to change a Pins in the Pins Planner, Pins can also be changed directly in the application.
- Click with the left mouse button on the Pins you want to change.
- Choose one of the options in the dialog that appears.
The following options are available here:
- Start Pin: The Pins are executed immediately (start route, display hint or announcement).
- Edit Pin: The Pins planner opens and the Pins to be edited are selected.
- Delete Pin: A security question appears asking if the Pins should really be deleted. The deletion can be confirmed with "OK" or canceled with "Cancel".
Note:
These options are displayed only to logged-in authors. If an end user clicks on a Pin, the corresponding action is executed immediately.
STEP 8: Save or discard Pins
As soon as you have captured a Pin with the Pins recorder, it appears in the Pins recorder. With the option "Apply" you can take over the captured Pins. The Pins planner appears and shows these Pins. If you want to discard the captured Pins, click on the "Cancel" button.
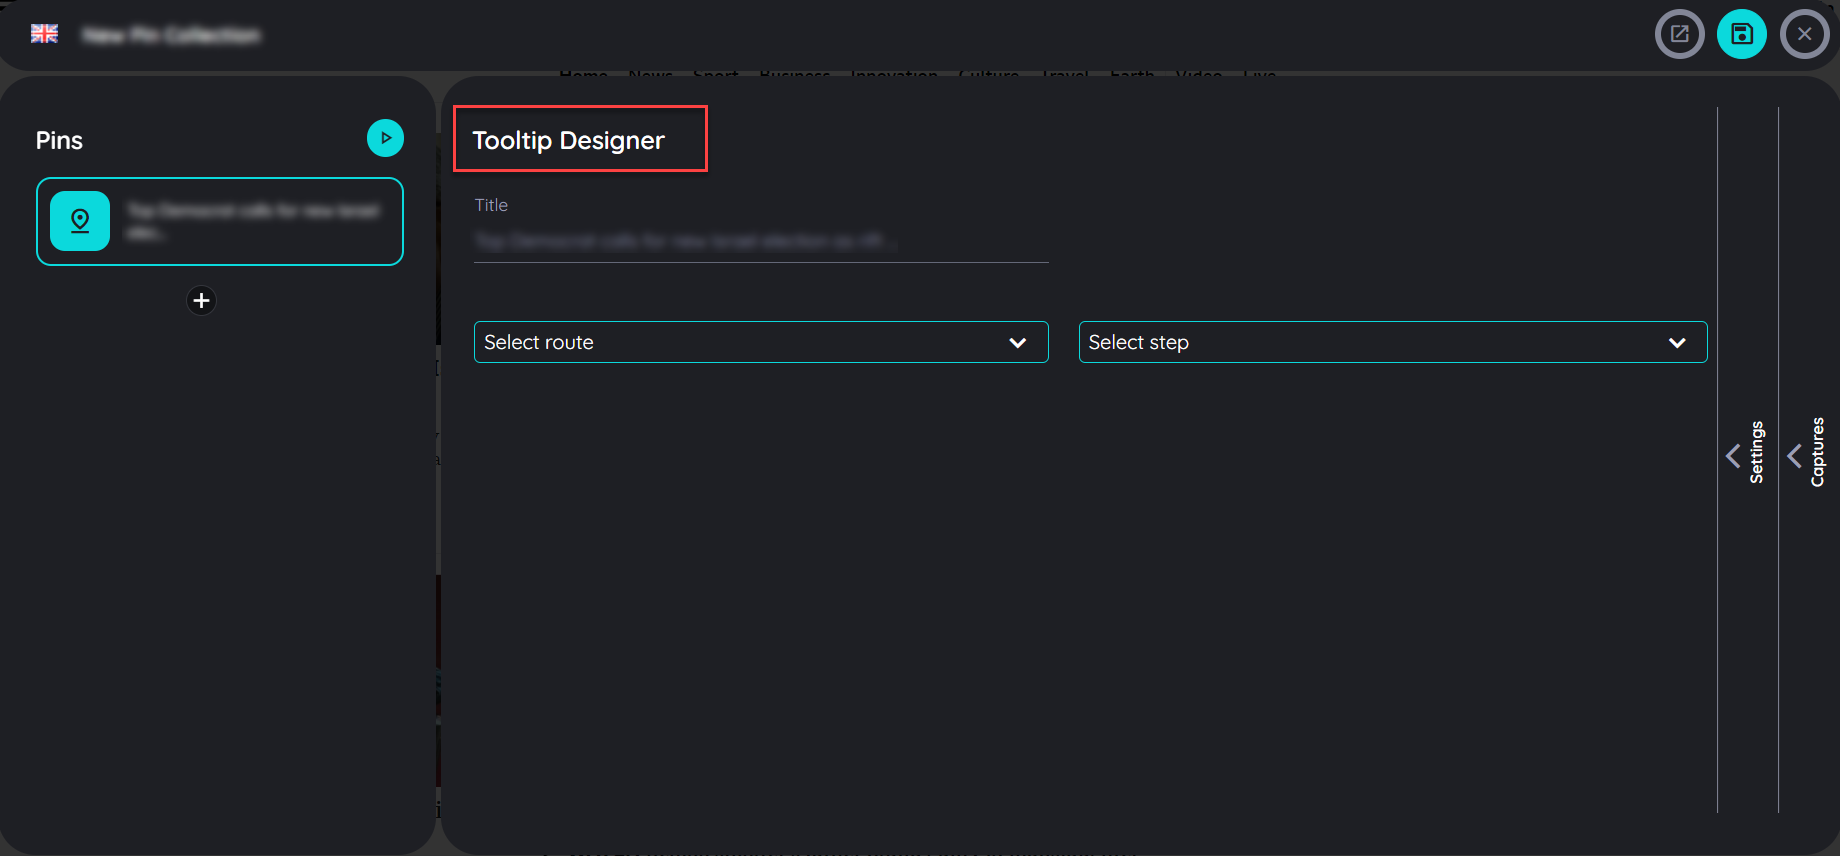
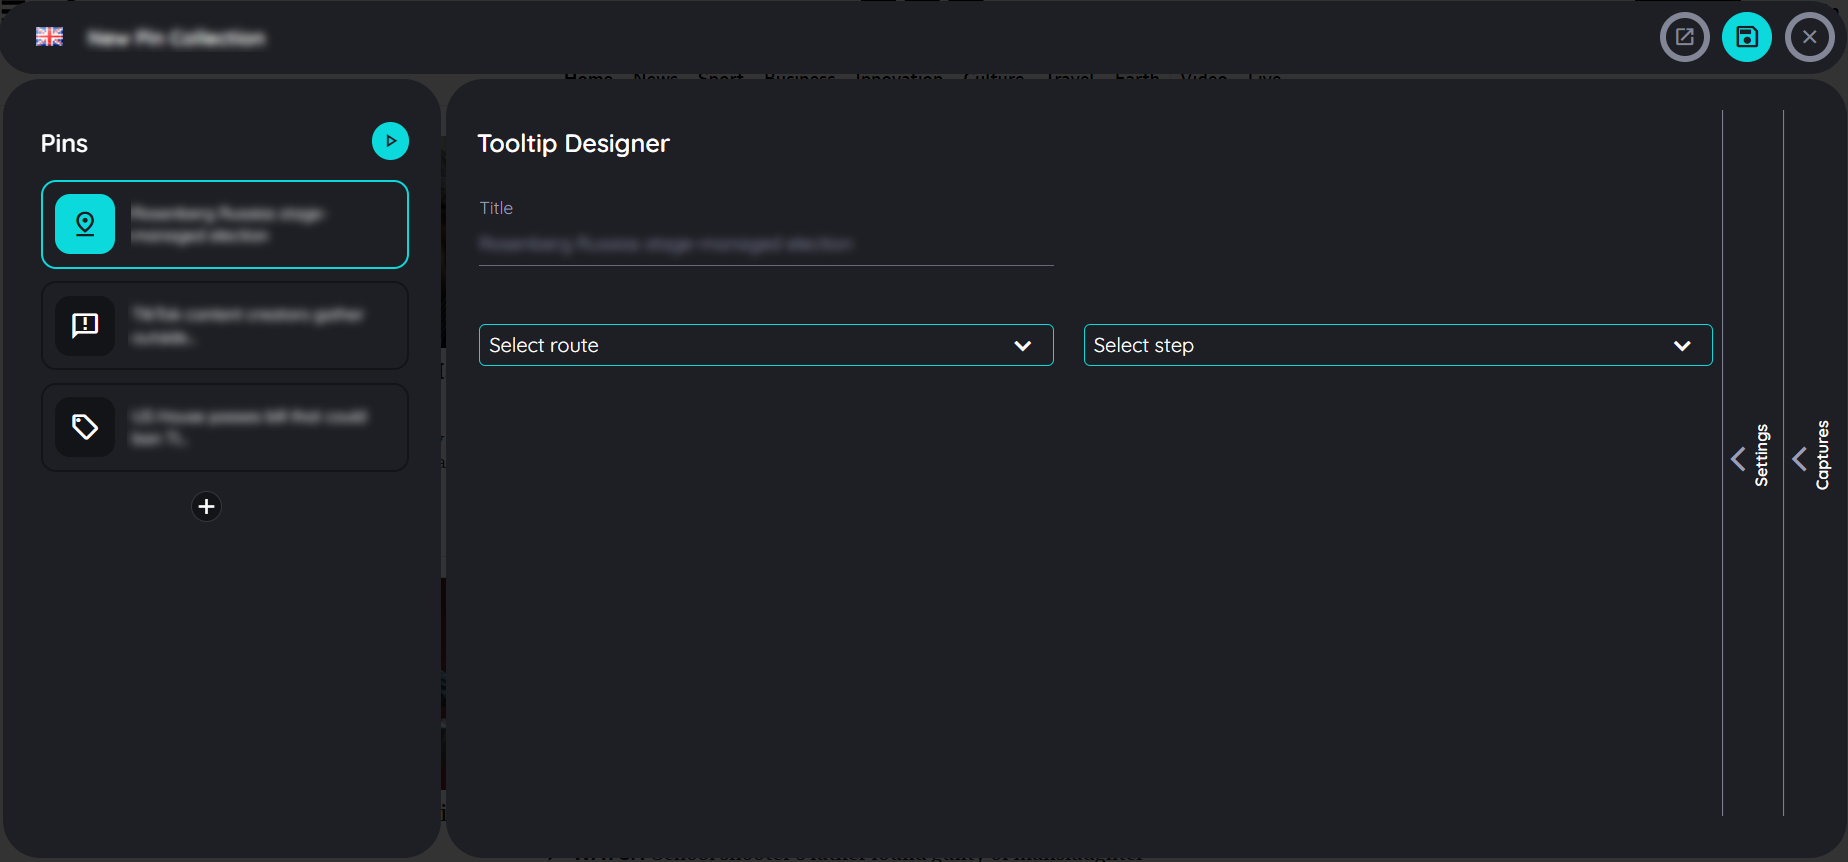
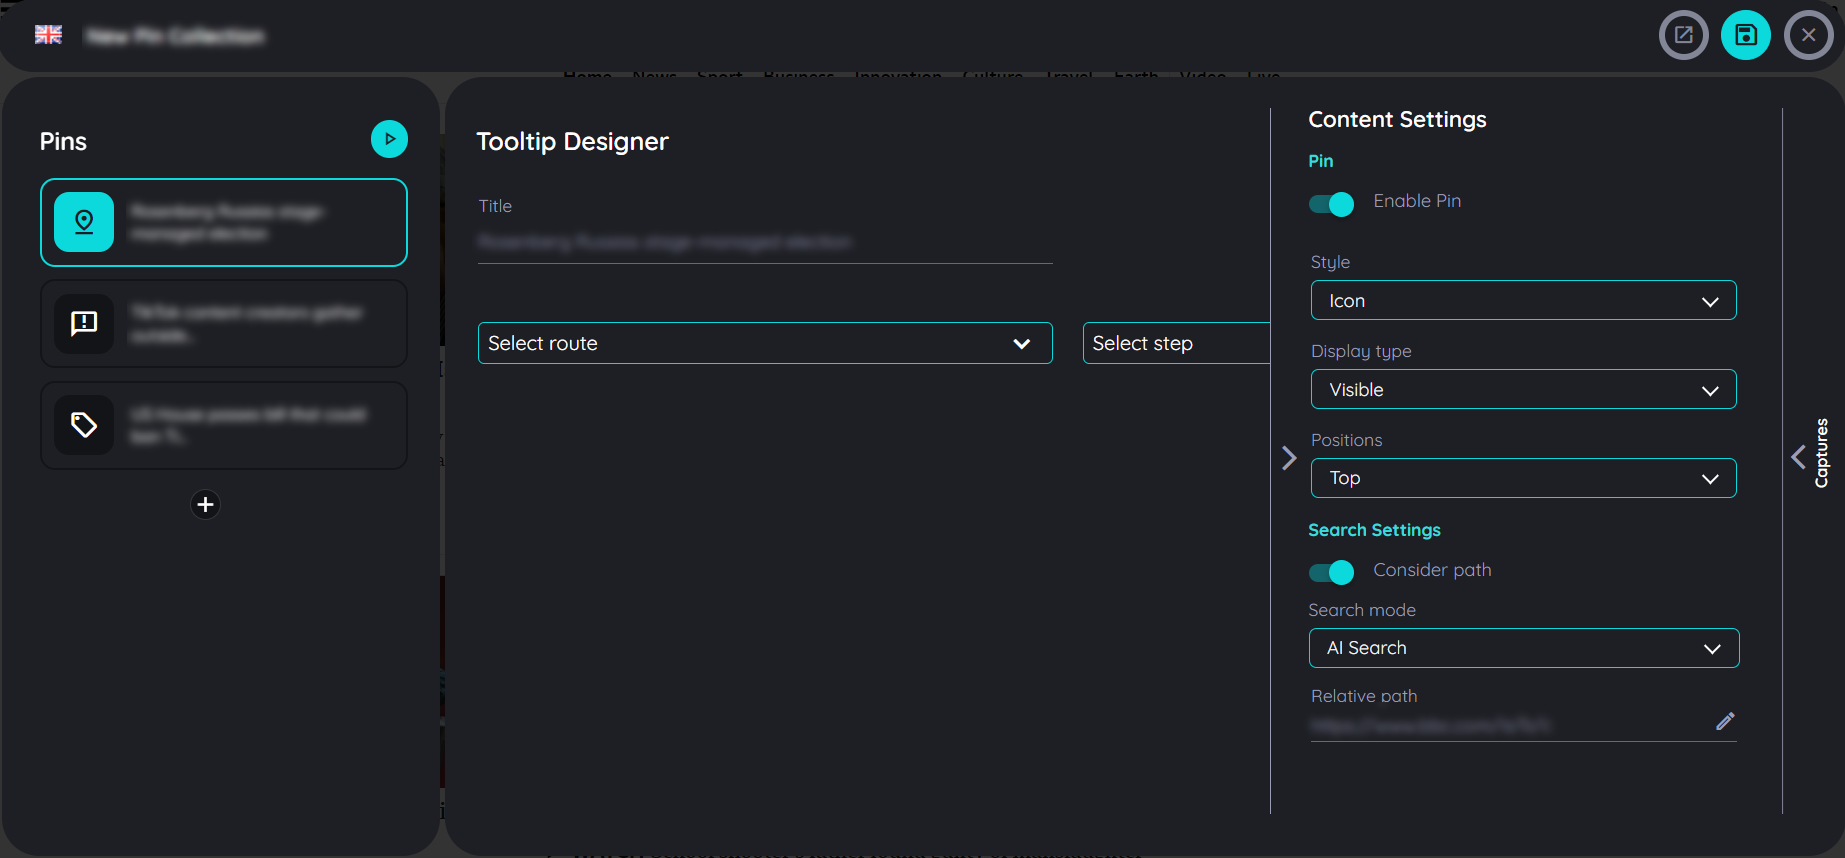
STEP 9a: Configure "Start a route" Pins
In the "Details" section of a Pins there are 2 tabs: Content (default) and Settings. While the "Content" tab is intended for the basic definition of a Pins, further, more detailed settings can be made in the "Settings" tab.
Content
- Title: Give the Pins a meaningful title.
- Select route: Select the available route that a user will take through when clicking these Pins.
- Select step: Select the step, where the route should start when a user clicks on that Pin.
Content Settings
- Style: There are two Styles available "Icon" (default) and "Frame". Icon as the name suggests shows only the icon on top of captured element while Frame lets you highlight the captured element with a sea-color border.
- Display Type: This setting defines the visibility of pin in page. There are three types "Visible" (default), "Invisible" and "Hover". Visible always shows pin on the page. Invisible type hides the pin from the page (it will trigger the custom code events, but it will not start and track user interactions like starting a route when clicking). Lastly "Hover" the pin is only visible if we hover the captured element.
- Positions: define where the Pins icon should appear "Top", "Bottom", "Left", "Right".
Search Settings
- Consider path: This setting defines if the URL of the page will be considered or not. So in case the current URL does not match with the one when the Pins were captured, the Pins won't be shown.
- Search mode: "Ai Search" (default), "Fuzzy Search"
- Relative Path: Define the precise URL path for this step.
A Pin can be tested by clicking on "Test Pins". As soon as all settings are correctly defined, the Pins can be saved by clicking on the "Disk" icon or canceled by the "x" icon (close).
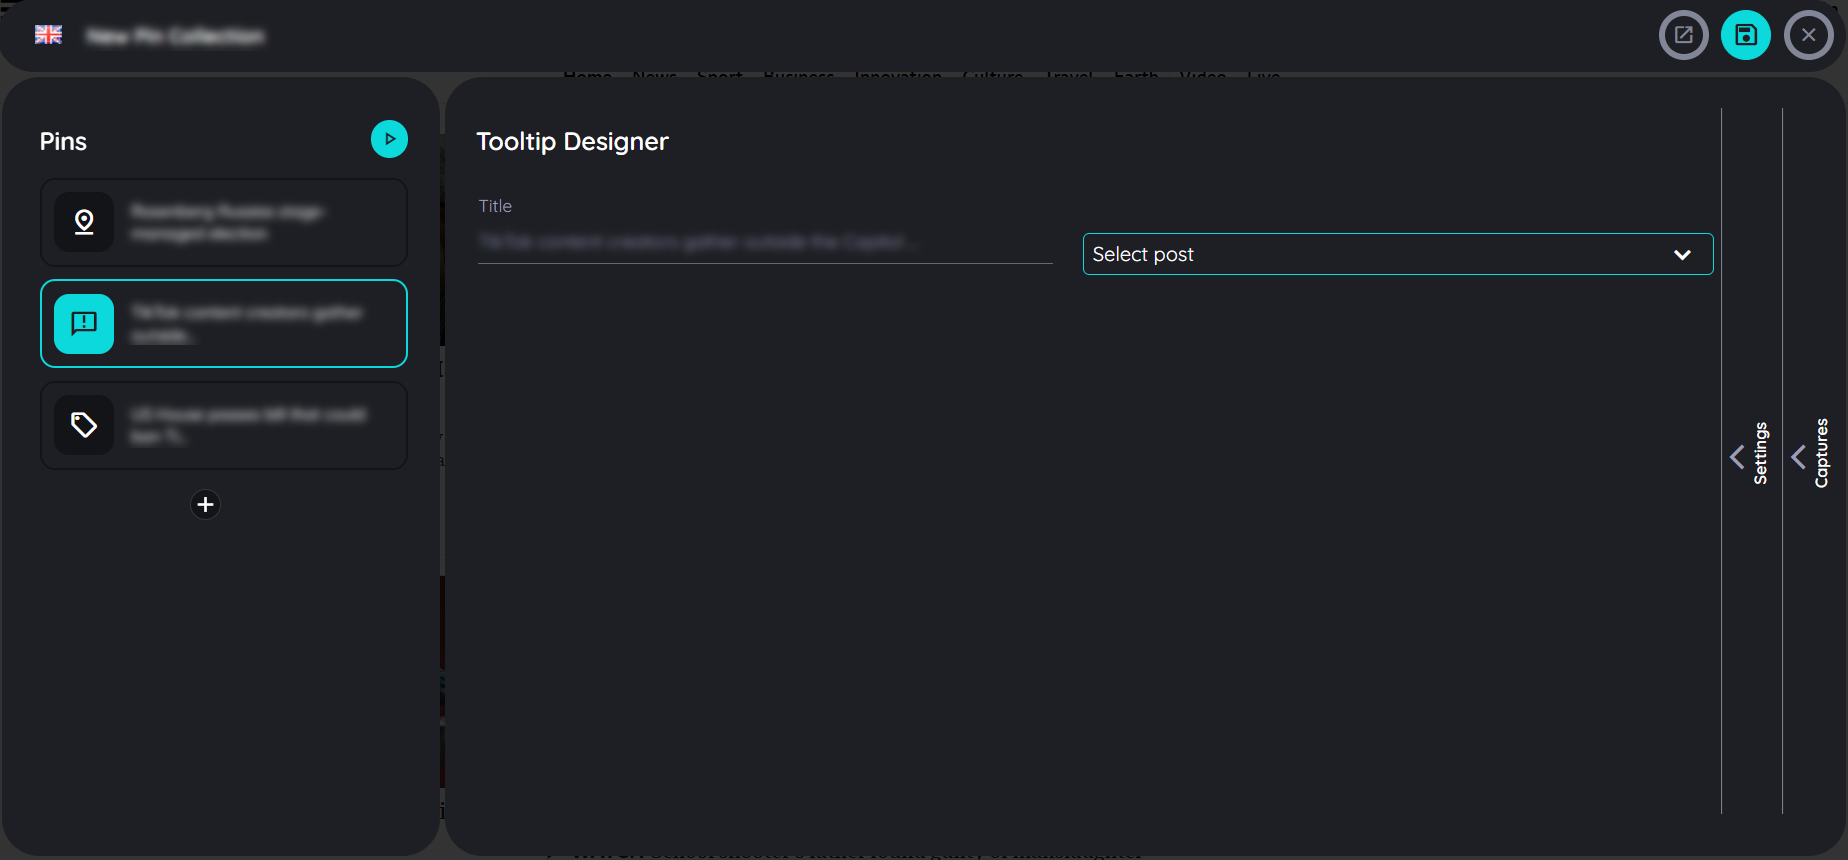
STEP 9b: Configure "Display announcement" Pins
Content
- Title: Give the Pins a meaningful title.
- Select Post: Select the available news that a user will see as an announcement.
The settings correspond to the settings for the Pins type "Start route".
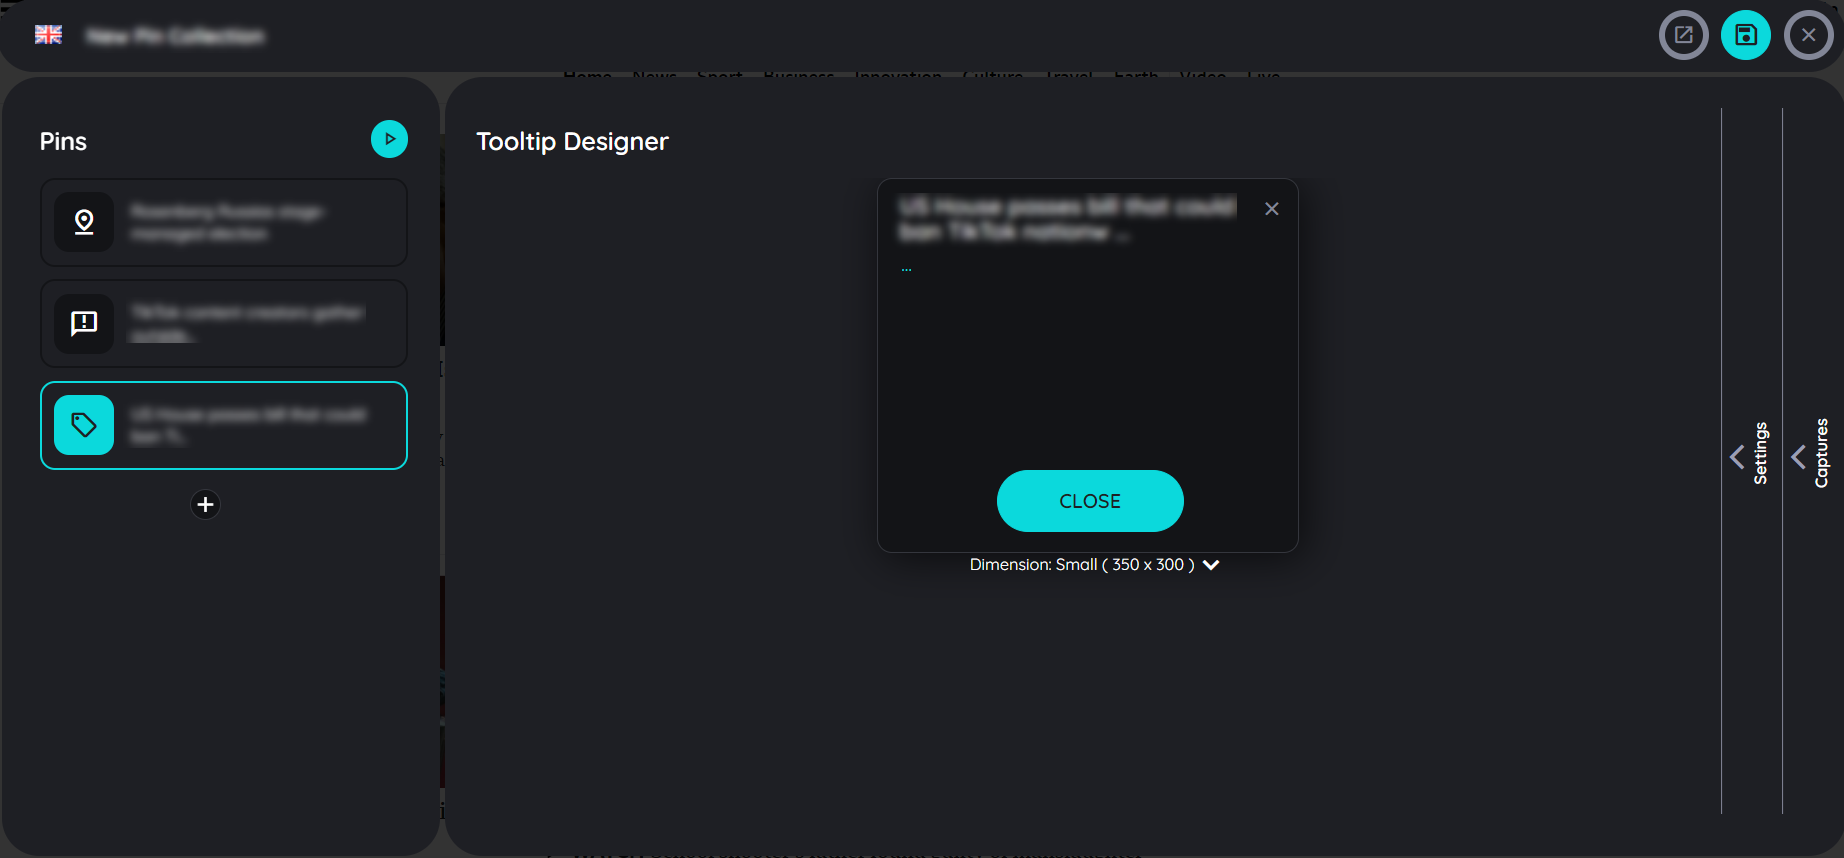
STEP 9c: Configure "Display hint" Pins
Content
The creation of the tooltip for the Pins type "Display hint" is identical to the design of tooltips within the route creation. Create a route
The settings correspond for the most part to the settings for the Pins type "Start route".
STEP 10: Test Pins
After the Pins set has been created completely or partially, it can be tested before or after saving. The test can be performed on the entire Pins set - or only on the selected Pins.
Test Pins set:
"Test Pins set" can be initiated with the "Play" icon in the "Pins" section of the Pins planner. After the test is initiated, a window displays the test results.

Test results for the entire Pins set
Test a single Pins:
Select the desired Pins in the Pins planner, section "Pins" and click on "Test Pins". After the test is initiated, a window displays the test results.
STEP 11: Save or discard Pins set
Once all or part of the Pins set has been created, it can be saved. By saving, the Pins set becomes visible and modifiable for other authors of the same subscription. For end users, the Pins set becomes visible only after publishing.
- You can save Pins set by clicking on the "Upload" icon in the upper right corner of the route planner.
- If you want to cancel the Pins set creation or discard the changes, you can click on the "x" icon.
- If you want to open the pins on the portal then you can click on the context menu.
- A confirmation popup will appear asking to save or discard changes
- On selecting "Save" it will save the whole content.
- On selecting "Discard" it will discard all changes and will not save them.

Now it is a good time to publish your Pins set. The procedure is largely analogous to the publication, republication or un publication of a route.
Publish, republish or unpublish a route
Updated 22 days ago